Сравнение версий

Ключ

  • Эта строка добавлена.
  • Эта строка удалена.
  • Изменено форматирование.


Предупреждение

Not suitable for ARM-based recorders. To get the image and instructions, please contact technical support portal.

With the help of this section, you can independently determine and download the necessary system image file and instructions for restoring the registrar on TRASSIR OS. And also find the necessary BIOS settings.

Find out the serial number of the NVR

To search for an image, you need to know the serial number of the NVR.

The serial number is indicated on the sticker, which is located on the back of the recorder, on the side of the USB connectors. 

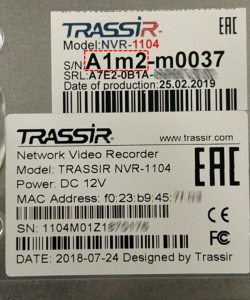
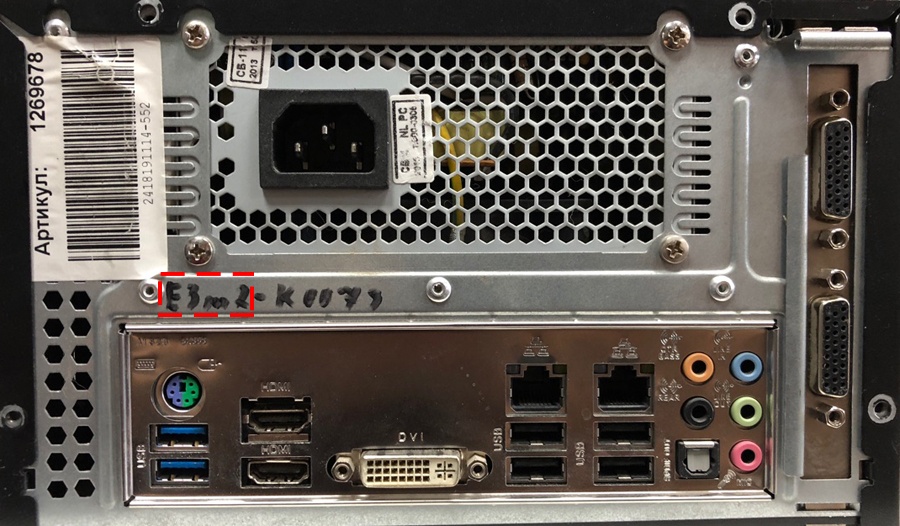
On NVR designed before 2015, the serial number can be indicated with a marker.


The TRASSIR OS system is installed on a flash drive, which can be external (USB-flash) or embedded in the motherboard.

The ways to install the system on the built-in flash drive and USB flash are different. 

The USB-flash system disk and the security key are installed inside the recorder case.
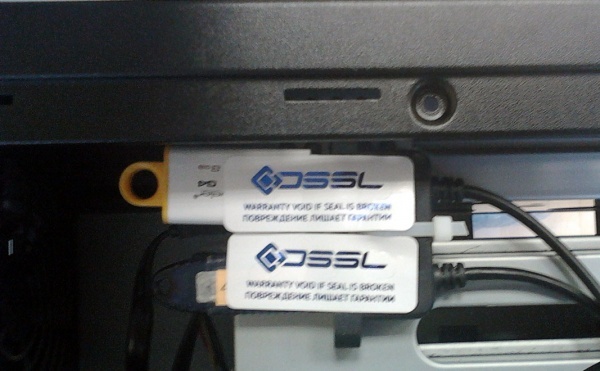

Подсказка

Removing the seal sticker from the USB flash and the protection key does not affect the warranty on other components of the NVR.


Информация
titleInformation

When writing a new image, you will also need an up-to-date license file.

It is not necessary to write a license to the image when creating a system disk.

It allows you not to lose the license file when resetting the NVR to factory settings.

If you do not write the license to the image, then the registrar will require a license file at the first launch or after resetting to factory settings.

If there is no saved license file, you can get it in one of the following ways:

  • If the registrar has Internet access and version 4.2 was recorded, then the registrar can download the license file independently. Use the following article;

  • Write an email with a request to send the license file to the mail support@trassir.com In the letter, specify the contact details and the number of the security key, which is indicated on the edge of the key body (you can send a photo);

    Save the resulting file to a USB drive. Connect the drive to the NVR after downloading TRASSIR and a window appears with information about the absence of a license file.

Click "Copy License file..." or "Select License file..." and point to the license file on the USB drive.

  • If an archive of logs and dumps of TRASSIR crashes was previously saved (formed by clicking on the "Logs & dumps of crashes..." button in the server settings), then the license file may be located inside the archive. Open or unzip the archive and check for a file named Trassir 3 License.txt .

If there is such a file, save it to a USB drive.

Connect the drive to the NVR after downloading TRASSIR and a window appears with information about the absence of a license file. Click "Copy License file..." or "Select License file..." and point to the license file on the USB drive.


Подсказка
titleHelp

If you could not determine the serial number of the registrar or are not sure about choosing the necessary system image, then write an email to support@trassir.com with information in the following form:

  • Contact person;
  • Company;
  • City;
  • Telephone;
  • E-mail;
  • Security key number;
  • Photo of the NVR housing from the connectors (all inscriptions must be readable).


When creating a new image for a registrar with a system disk on USB-flash, we recommend taking a new USB disk with a size not less than that specified in the system image selection table.

The brand, model and type of the drive (USB-2.0, USB-3.0) do not matter, but we recommend using any proven, well-known brands.

USB-flash with the new image can be installed in any USB connector, but do not forget to disconnect the old USB-flash with the system.

Possible recording methods

  1. For models with a system disk on USB-flash, there are two ways to write a system image:
    1. Recording from ISO image
      This option is the simplest, it is carried out directly on Windows and allows you to use an image with the current version of the TRASSIR software.
      But with this method, it is not possible to write a license to the system and at the first start of the system, as well as later, when resetting to factory settings, you will need to re-add the license file.
    2. Recording from images with a Linux VM.
      This option is somewhat more complicated and requires the installation of a virtualization program in Windows. But it allows you to write a license to the system image and at the first start or reset to factory settings, the license will be saved in the registrar.
  2. For models with built-in memory or with M disks.2 SSD is used in a way using a specially created drive with USBProduction.

If for some reason it is not possible to flash the built-in system disk, then contact our technical support


Image Selection

Раскрыть
titleTRASSIR Client \ MiniClient


Serial numberSystem DiskSystem imageBIOS Settings
C1
C1m1
USB-flash
16GB recommended
At least 8GB

ISO image
Trassir-4.4.1.0-1181067-DuoStation-64
Instructions for recording ISO image
OVA image
Trassir-3.2-6069-DuoStation-64
Instructions for recording from OVA image

BIOS Features \ Boot Option #1 – UEFI
BIOS Features \ Boot Mode – UEFI and Legacy
Power Management \ AC BACK – Always ON
C2USB-flash
16GB recommended
At least 8GB

ISO image
Trassir-4.4.1.0-1181058-MiniNVR-64
Instructions for recording ISO image
OVA image
Trassir-3.2-6011-MiniNVR-64
Instructions for recording from OVA image

Chipset \ South Bridge \ Restore AC Power Loss – Power ON
Boot \ OS Selection – UEFI Windows 7
Boot \ Fast Boot – Disable
Boot \ Boot Option #1 - UEFI:...
In the Boot Device Priority menu, install booting from a USB flash drive
C3
C3s1
USB-flash
16GB recommended
At least 8GB

ISO image
Trassir-4.4.1.0-1181058-MiniNVR-64
Instructions for recording ISO image
OVA image
Trassir-3.2-3726-MiniNVR-64
Instructions for recording from OVA image

Advanced \ Miscellaneous Configuration \ State After G3 – S0 State
Boot \ Add Boot Options - First
Boot \ EFI/Legacy Device Order - EFI device first
Boot\EFI - Configure boot priority fromEFI USB Device (KingstonDataTraveler 3.0)

C4
C4s1
C4s1

integrated

Trassir-4.4.1.0-1181058-MiniNVR-64
Instructions for writing an image to the integrated memory
The necessary file is in the archive with the extension .rbi

Setup \ Advanced \ Miscellaneous Configuration \ State After G3 – S0 State
Boot \ Add Boot Options - First
Boot \ EFI/Legacy Device Order - EFI device first
Boot \ EFI - EFI - Configure boot priority from EFI Hard Drive (or installed external USB Flash)
C5n1USB-flash
16GB recommended
At least 8GB

ISO image
Trassir-4.4.1.0-1181058-MiniNVR-64
Instructions for recording ISO image
OVA image
Trassir-4.0-3610-MiniNVR-64
Instructions for recording from OVA image

Advanced \ Chipset Configuration \ Restore on AC/Power Loss – Power On
Boot \ Full Screen Logo – Disabled
Boot \ Fast Boot – Disable
In the Boot menu \ Boot Option Priorities install booting from a USB flash drive
C6integrated

Boot \ Boot Option #1 = UEFI: JetFlashTranscend (либо установленная внешняя USB-flash)
Advanced \ Chipset Configuration \ Restore on AC Power Loss = Power ON
Advanced \ Storage Configuration \ SATA3_1 \ Hot Plug = Enabled
Advanced \ Storage Configuration \ SATA3_2 \ Hot Plug = Enabled
Save settings and exit (F10 and Yes)

C7m1
C8m1
C9m1
C9m2

M.2 SSD 32GB


Раскрыть
titleC7m1

Boot \ Security \ Secure Boot = Disable
Secure Boot \ Boot Option #1 = UEFI OS (M2_1: TS32GMTS400)
Boot \ USB Device BBS Priorities\Boot Option #1 = UEFI OS (M2_1: TS32GMTS400)
Advanced \ APM Configuration \ Restore AC Power Loss = Power ON
Save settings and exit (F10 and Yes)


Раскрыть
titleC8m1 C9m1 C9m2

Switch to Advanced Mode by pressing F6
Advanced \ Chipset Configuration \ Restore on AC Power Loss = Power ON
Boot \ Boot Option #1 = UEFI: TS32GMTS400
Boot \ Full Screen Logo = Disabled
Save settings and exit (F10 and Yes)


C10m1

M.2 SSD 128GB

Enter the BIOS and change its parameters:
Peripherals\Initial Display Output = PCIe 1 Slot
Chipset\Internal Graphics = Auto
Power\AC BACK = Always On
BIOS\Boot option #1 = UEFI OS (ADATA SX6000LNP)
BIOS\ Full Screen LOGO Show = Disable

Save BIOS Settings (F10 and YES).

C11m1

integrated

Configure the following parameters:
Setup \ Advanced \ Miscellaneous Configuration \ State After G3 – S0 State
Boot \ Add Boot Options - First
Boot \ EFI/Legacy Device Order - Legacy first
Boot \ EFI - EFI - Configure the download priority from Hard drive

Save settings and exit (F10 and Yes)

C12m1

M.2 SSD 128GB

Configure the following parameters:
BIOS \ Full Screen LOGO Show -> Disabled
BIOS \ Boot Option #1 -> UEFI Hard Disk: UEFI OS
Peripherals \ Initial Display Output -> PCI
Chipset \ Internal Graphics -> Disabled
Power \ AC BACK -> Always On

Save settings and exit (F10 and Yes)

C13m1

integrated

Instructions for recording an image

Not required

C14m1

SSD 120GB

Enter the BIOS and change its parameters:
Settings/Advanced/Integrated Graphics Configuration/Initiate Graphic Adapter: PEG
Settings/Advanced/Power Management Setup/Restore after AC Power Loss: Power On
Settings/Boot/Full Screen Logo Display: Disabled
Settings/Boot/Boot Option #1: UEFI USB Key:UEFI JetFlasTranscend

Save BIOS Settings (F10 and YES).


Раскрыть
titleTRASSIR MiniNVR


Serial numberSystem DiskSystem imageBIOS Settings
E2
E2m1
E2s1
E2s2
USB-flash 8GB

TRASSIR-3.1-1133-MiniNVR

Instructions for recording from OVA image


E3
E3m1
E3m2
E3m3
E3n1
E3n2
E3n3
E3n4
E3n5
E3s1
E3s2
USB-flash 8GB

BIOS Features \ Boot Option #1 – UEFI
BIOS Features \ Boot Mode – UEFI and Legacy
Power Management \ AC BACK – Always ON

E4
E4s1
E4t1
USB-flash 8GB

Chipset \ South Bridge \ Restore AC Power Loss – Power ON
Boot \ OS Selection – UEFI Windows 7
Boot \ Fast Boot – Disable
Boot \ Boot Option #1 - UEFI:...
In the Boot Device Priority menu, install booting from a USB flash drive

E5
E5m1
E5s1
E5s2
E5s14
E5s24
USB-flash 8GB

Advanced \ Chipset Configuration \ Restore on AC/Power Loss – Power On
Boot \ Full Screen Logo – Disabled
Boot \ Fast Boot – Disable
In the Boot menu \ Boot Option Priorities install booting from a USB flash drive

E6
E6m1
USB-flash 8GB

Advanced \ Miscellaneous Configuration \ State After G3 – S0 State
Boot \ Add Boot Options - First
Boot \ EFI/Legacy Device Order - EFI device first
Boot\EFI - Configure boot priority fromEFI USB Device (KingstonDataTraveler 3.0)

E7
E7s1
USB-flash 8GB

Advanced \ Miscellaneous Configuration \ State After G3 – S0 State
Boot \ Add Boot Options - First
Boot \ EFI/Legacy Device Order - EFI device first
Boot\EFI - Configure boot priority fromEFI USB Device (KingstonDataTraveler 3.0)

E8
E8m1
E8m2
E8s1
E9
E10

integrated

Setup \ Advanced \ Miscellaneous Configuration \ State After G3 – S0 State
Boot \ Add Boot Options - First
Boot \ EFI/Legacy Device Order - EFI device first
Boot \ EFI - EFI - Configure boot priority from EFI Hard Drive (or installed external USB Flash)
Save settings and exit (F10 and Yes)

E11
E11n1
USB-flash 8GB

Boot \ Boot Option #1 = UEFI: JetFlashTranscend
Advanced \ Chipset Configuration \ Restore on AC Power Loss = Power ON
Advanced \ Storage Configuration \ SATA3_1 \ Hot Plug = Enabled
Advanced \ Storage Configuration \ SATA3_2 \ Hot Plug = Enabled
Save settings and exit (F10 and Yes)

E12
E13m1
E13m2

integrated


Раскрыть
titleE12

Boot \ Boot Option #1 = UEFI: JetFlashTranscend
Advanced \ Chipset Configuration \ Restore on AC Power Loss = Power ON
Advanced \ Storage Configuration \ SATA3_1 \ Hot Plug = Enabled
Advanced \ Storage Configuration \ SATA3_2 \ Hot Plug = Enabled
Save settings and exit (F10 and Yes)


Раскрыть
titleE13m1 E13m2

Setup \ Advanced \ Miscellaneous Configuration \ State After G3 – S0 State
Boot \ Add Boot Options - First
Boot \ EFI/Legacy Device Order - Legacy first
Boot \ EFI - EFI - Configure the download priority from Hard drive

Save settings and exit (F10 and Yes)


E14m1

E14m2

E15m1

USB-flash 16GB

Switch to Advanced Mode by pressing F6
Advanced \ Chipset Configuration \ Primary Graphics Adapter = Onboard
Advanced \ Chipset Configuration \ Restore on AC Power Loss = Power ON
Boot \ Boot Option #1 = UEFI: JetFlashTranscend
Boot \ Full Screen Logo = Disabled
Save settings and exit (F10 and Yes)

A7m1
A7m2
A8m1
A8m2
integrated

Not required


Раскрыть
titleDuoStation


Serial numberSystem DiskSystem imageBIOS Settings
L1
L1m1
USB-flash 8GB

Boot \ CMS(Compatibillity Support Module) - Enabled
Boot \ Full Screen Logo – Disabled
Boot \ Fast Boot – Disable
In the Boot menu \ Boot Option Priorities install booting from a USB flash drive.
Advanced \ Chipset Configuration \ Restore on AC/Power Loss – Power On
Advanced \ Storage Configuration \ SATA2_1 \ Hot Plug - Enabled
Advanced \ Storage Configuration \ SATA2_2 \ Hot Plug - Enabled

L2integrated

Setup \ Advanced \ Miscellaneous Configuration \ State After G3 – S0 State
Boot \ Add Boot Options - First
Boot \ EFI/Legacy Device Order - EFI device first
Boot \ EFI - EFI - Configure boot priority from EFI Hard Drive (or installed external USB Flash)

L4
L4m1
L4m2
USB-flash 8GB
or
USB-flash 16GB

Boot \ Boot Option #1 = UEFI: JetFlashTranscend
Advanced \ Chipset Configuration \ Restore on AC Power Loss = Power ON
Advanced \ Storage Configuration \ SATA3_1 \ Hot Plug = Enabled
Advanced \ Storage Configuration \ SATA3_2 \ Hot Plug = Enabled
Save settings and exit (F10 and Yes)

L5
L5m1
integrated

Setup \ Advanced \ Miscellaneous Configuration \ State After G3 – S0 State
Boot \ Add Boot Options - First
Boot \ EFI/Legacy Device Order - EFI device first
Boot\EFI - Configure boot priority fromHard Drive
Save settings and exit (F10 and Yes)

L6integrated

Device manager > System Setup > Advanced > After G3 ON = S0
Save settings and exit (F10 and Yes)

L8m1
L8m2
L9m1

USB-flash 16GB

Switch to Advanced Mode by pressing F6
Advanced \ Chipset Configuration \ Primary Graphics Adapter = Onboard
Advanced \ Chipset Configuration \ Restore on AC Power Loss = Power ON
Boot \ Boot Option #1 = UEFI: JetFlashTranscend
Boot \ Full Screen Logo = Disabled
Save settings and exit (F10 and Yes)

L11m1
L11r1

integrated

Setup \ Advanced \ Miscellaneous Configuration \ State After G3 – S0 State
Boot \ Add Boot Options - First
Boot \ EFI/Legacy Device Order - EFI device first
Boot\EFI - Configure boot priority fromHard Drive
Save settings and exit (F10 and Yes)

L12

USB-flash 16GB

Trassir-4.2-1145253-DuoStationG9
Instructions for recording ISO image
If you have Trassir-4.2-1139582 firmware installed,
then use the package below to update:
Trassir-4.2-1145447-DuoStation-64

Press F2 to enter the BIOS.
Configure the following parameters:
Switch to Advanced Mode by pressing F6
Advanced \ Chipset Configuration \ Primary Graphics Adapter = Onboard
Advanced \ Chipset Configuration \ Restore on AC Power Loss = Power ON
Boot \ Boot Option #1 = UEFI: JetFlashTranscend
Boot \ Full Screen Logo = Disabled
Save settings and exit (F10 and Yes)

L13m1

integrated

Press F2 to enter the BIOS.
Configure the following parameters:
Device manager > System Setup > Advanced > After G3 ON = S0
Save settings and exit (F10 and Yes)

A7m3
A7m4
integrated

Not required

M5
M5m1
M5m2
M5n1
M5n2
M5s0
M5s1
USB-flash 8GB

Power management – Always ON
OS Type – Other OS
Boot Mode – UEFI and Legacy
Fast Boot – Disable
In the Boot Device Priority menu, install booting from a USB flash drive


Раскрыть
titleDuoStation Pro


Serial numberSystem DiskSystem imageBIOS Settings
L3
L3m1
L3m3
L3u1
L3u2
L3u3
L3u4
USB-flash 32GB
or
USB-flash 16GB


Раскрыть
titleL3 L3m3

Power Management \ AC Back – Always ON
BIOS Features \ Windows 8/10 features: – Other OS
BIOS Features \ Boot option#1: – UEFI:JetFlashTranscend 32GB
Save settings and exit (F10 and Yes)


Раскрыть
titleL3m1 L3u1 L3u2

Boot \ Secure Boot \ OS Type – Other OS
Boot \ Wait For F1 if Error: – Disabled
Advanced \ APM Configuration \ Restore AC Power Loss – Power ON
Boot \ Boot option#1: – UEFI:JetFlashTranscend 32GB
Save settings and exit (F10 and Yes)


Раскрыть
titleL3u3 L3u4

Switch to Advanced Mode by pressing F7
Boot \ Secure Boot \ OS Type – 
Disable
Boot \ Boot Configuration \ Wait For 'F1' If Error – Disable
Boot \ USB Device BBS Priorities\Boot Option #1 – Disabled
Boot \ USB Device BBS Priorities\Boot Option #2 – Disabled
Boot \ Hard drive Device BBS Priorities\Boot Option #1 - Disable
Boot \ Hard drive Device BBS Priorities\Boot Option #2 - Disable
Boot \ Boot Options Priorities \ Boot Option #1 – UEFI:JetFlashTranscend
The rest are Boot Option # - Disable
Advanced \ APM Configuration \ Restore AC Power Loss – Power ON
Save settings and exit (F10 and Yes)


L7m1M.2 SSD 32GB

Switch to Advanced Mode by pressing F6
Boot\Full Screen Logo = Disable
Boot\Boot Option #1 = UEFI OS (M2_1:TS32GMTS400)
Advanced\Chipset Configuration\Restore AC Power Loss = Power ON
Save settings and exit (F10 and Yes)


Раскрыть
titleTRASSIR Nexus \ Absolute


Serial numberSystem DiskSystem imageBIOS Settings
M6m2
M6m5
M7m2
M7m5
USB-flash 32GB


Раскрыть
titleM6m2 M6m5

Boot \ Security Boot menu \ OS Type = Other OS
Ai Tweaker \ CPU Power Managment \ Enhanced Intel SpeedStep Technology = Disabled
Secure Boot \ Boot Option #1 = UEFI: JetFlashTranscend
Advanced \ APM \ Restore AC Power Loss = Power ON


Раскрыть
titleM7m2 M7m5

Boot \ Secure Boot menu \ OS Type = Other OS
Secure Boot \ Boot Option #1 = UEFI: JetFlashTranscend
Advanced \ APM Configuration \ Restore AC Power Loss = Power ON
Advanced \ Onboard Devices Configuration \ ASMedia Storage Controller (SATA6G_E12) = Enabled


M8m5
M8m14
M9m5
M9m8
USB-flash
16GB recommended
At least 8GB
Switch to Advanced Mode by pressing F6
Advanced \ Chipset Configuration \ Restore on AC Power Loss = Power ON
Boot \ Boot Option #1 = UEFI: JetFlashTranscend
Boot \ Full Screen Logo = Disabled
Save settings and exit (F10 and Yes)
M14m1M.2 SSD 128GB by PCI-adapter
or
USB-flash
16GB recommended
At least 8GB
Switch to Advanced Mode by pressing F6
Advanced \ Chipset Configuration \ Restore on AC Power Loss = Power ON
Boot \ Boot Option #1 = UEFI: JetFlashTranscend or PS128GPM280SSDR
Boot \ Full Screen Logo = Disabled
Save settings and exit (F10 and Yes)


Раскрыть
titleTRASSIR QuattroStation


Serial numberSystem DiskSystem imageBIOS Settings

M6
M6m1
M6m3
M6m6
M6n1
M6n2
M6n3
M6s0
M6s2
M6s3
M7
M7m3
M7m6
M7s0
M7s5
M7s6

USB-flash 32GB


Раскрыть
titleM6 M6m1 M6m3 M6m6 M6n1 M6n2 M6n3 M6s0 M6s2 M6s3

Boot \ Security Boot menu \ OS Type = Other OS
Ai Tweaker \ CPU Power Managment \ Enhanced Intel SpeedStep Technology = Disabled
Secure Boot \ Boot Option #1 = UEFI: JetFlashTranscend
Advanced \ APM \ Restore AC Power Loss = Power ON


Раскрыть
titleM7 M7s0

Settings \ Advanced \ Power Managment Setup \ Restore after AC Power Loss = Power ON
Settings \ Boot \ Boot mode select = UEFI
Settings \ Boot \ UEFI USB Key Drive BBS Priorities \ Boot Option #1 = UEFI: JetFlash...


Раскрыть
titleM7m3 M7m6 M7s5 M7s6

Boot \ Secure Boot menu \ OS Type = Other OS
Secure Boot \ Boot Option #1 = UEFI: JetFlashTranscend
Advanced \ APM Configuration \ Restore AC Power Loss = Power ON
Advanced \ Onboard Devices Configuration \ ASMedia Storage Controller (SATA6G_E12) = Enabled


M8m1
M8m3
M8m6
M8m8
M8m10
M8m12
M8m16
M8m19
M8n1
M8n2
M8s1
M8s3
M8s5
M9m1
M9m3
M9m6

M.2 128GB SSD via USB adapter
or

USB-flash
16GB recommended
At least 8GB


Раскрыть
titleM8m1 M8m6 M8m8 M8m10 M8m12 M8m16 M8m19 M8s1 M8s5

Switch to Advanced Mode by pressing F6
Advanced \ Chipset Configuration \ Restore on AC Power Loss = Power ON
Boot \ Boot Option #1 = UEFI: JetFlashTranscend
Boot \ Full Screen Logo = Disabled
Save settings and exit (F10 and Yes)


Раскрыть
titleM8m3 M8n1 M8n2 M8s3

Boot \ Secure Boot menu \ OS Type = Other OS
Secure Boot \ Boot Option #1 = UEFI: JetFlashTranscend
Advanced \ APM Configuration \ Restore AC Power Loss = Power ON
Advanced \ Onboard Devices Configuration \ ASMedia Storage Controller (SATA6G_E12) = Enabled
Save settings and exit (F10 and Yes)


Раскрыть
titleM9m1 M9m3 M9m6

Switch to Advanced Mode by pressing F6
Advanced \ Chipset Configuration \ Restore on AC Power Loss =Power ON
Boot \ Boot Option #1 =UEFI: JetFlashTranscend or Transcend MTS400
Boot \ Full Screen Logo =Disabled
Save settings and exit (F10 and Yes)


M10m1integrated

Advanced > Chipset Configuration > After G3 ON = S0
Boot > EFI > using the +/- keys, we set the EFI Hard Drive (InnoDisk Corp. - mSATA) to the top position (or we put an external USB flash on the top position)
Save settings and exit (F10 and Yes)

M12m1

M.2 128GB SSD via USB adapter
or

USB-flash
16GB recommended
At least 8GB


Раскрыть
titleM12m1

Security \ Secure Boot = Disable
Boot \ Boot Options Priorities \ Boot Option #1 = UEFI: JetFlashTranscend
Advanced \ Chipset Configuration \ Restore AC Power Loss = Power ON
Save settings and exit (F10 and Yes)


Раскрыть
titleM13m1

Switch to Advanced Mode by pressing F6
Advanced \ Chipset Configuration \ Restore on AC Power Loss =Power ON
Boot \ Boot Option #1 =UEFI: JetFlashTranscend or Transcend MTS400
Boot \ Full Screen Logo =Disabled
Save settings and exit (F10 and Yes)


Раскрыть
titleQuattroStation Pro


Serial numberSystem DiskSystem imageBIOS Settings
M6m4
M6m7
M6s4
M7m1
M7m4
M7m7
M7s1
M7s7
USB-flash 32GB


Раскрыть
titleM6m4 M6m7 M6s4

Boot \ Security Boot menu \ OS Type = Other OS
Ai Tweaker \ CPU Power Managment \ Enhanced Intel SpeedStep Technology = Disabled
Secure Boot \ Boot Option #1 = UEFI: JetFlashTranscend
Advanced \ APM \ Restore AC Power Loss = Power ON


Раскрыть
titleM7m1 M7s1

Settings \ Advanced \ Power Managment Setup \ Restore after AC Power Loss = Power ON
Settings \ Boot \ Boot mode select = UEFI
Settings \ Boot \ UEFI USB Key Drive BBS Priorities \ Boot Option #1 = UEFI: JetFlash...


Раскрыть
titleM7m4 M7m7 M7s7

Boot \ Secure Boot menu \ OS Type = Other OS
Secure Boot \ Boot Option #1 = UEFI: JetFlashTranscend
Advanced \ APM Configuration \ Restore AC Power Loss = Power ON
Advanced \ Onboard Devices Configuration \ ASMedia Storage Controller (SATA6G_E12) = Enabled


M8m2
M8m4
M8m7
M8m9
M8m11
M8m13
M8m15
M8m17
M8m18
M8m20
M8s2
M8s4
M9m2
M9m4
M9m7
M12m2
M13m2
M.2 128GB SSD via USB adapter
or
USB-flash
16GB recommended
At least 8GB


Раскрыть
titleM8m2 M8m7 M8m9 M8m11 M8m13 M8m15 M8m17 M8m18 M8m20 M8s2

Switch to Advanced Mode by pressing F6
Advanced \ Chipset Configuration \ Restore on AC Power Loss = Power ON
Boot \ Boot Option #1 = UEFI: JetFlashTranscend or Transcend MTS400
Boot \ Full Screen Logo = Disabled
Save settings and exit (F10 and Yes)


Раскрыть
titleM8m4 M8s4

Boot \ Secure Boot menu \ OS Type = Other OS
Secure Boot \ Boot Option #1 = UEFI: JetFlashTranscend
Advanced \ APM Configuration \ Restore AC Power Loss = Power ON
Advanced \ Onboard Devices Configuration \ ASMedia Storage Controller (SATA6G_E12) = Enabled
Save settings and exit (F10 and Yes)


Раскрыть
titleM9m2 M9m4 M9m7

Switch to Advanced Mode by pressing F6
Advanced \ Chipset Configuration \ Restore on AC Power Loss =Power ON
Boot \ Boot Option #1 =UEFI: JetFlashTranscend or Transcend MTS400
Boot \ Full Screen Logo =Disabled
Save settings and exit (F10 and Yes)


Раскрыть
titleM12m2

Security \ Secure Boot = Disable
Boot \ Boot Options Priorities \ Boot Option #1 = UEFI: JetFlashTranscend
Advanced \ Chipset Configuration \ Restore AC Power Loss = Power ON
Save settings and exit (F10 and Yes)


Раскрыть
titleM13m2

Switch to Advanced Mode by pressing F6
Advanced \ Chipset Configuration \ Restore on AC Power Loss =Power ON
Boot \ Boot Option #1 =UEFI: JetFlashTranscend or Transcend MTS400
Boot \ Full Screen Logo =Disabled
Save settings and exit (F10 and Yes)


Раскрыть
titleTRASSIR UltraStation(-I)


Serial numberSystem DiskSystem imageBIOS Settings
H4
H4rn1
SATA SSDAdvanced \ Boot Feature \ Restore On AC Power Loss – Power On
Boot \ UEFI Boot Device BBS Priorities \ 1st Device - UEFI OS
Boot \ Hard Disk Device BBS Priorities \ 1st Device - Hard Disk:P0: INTEL SSD...
Boot \ 1st Boot Device - UEFI OS

H6m1
H6m2
H6m3
H6m4
H7m1
H7m2
H7m3
H7m4
H8m1
H8m2
H8m3
H8m4
H9m1
H9m2
H9m3
H9m4

SATA SSD


Раскрыть
titleH6m1 H6m2 H6m3 H6m4 H7m1 H7m2 H7m3 H7m4

Advanced \ Boot Feature \ Restore on AC Power Loss = Power ON
Boot \ Boot Mode Select = UEFI
Boot \ Boot Option #1 = INTEL SSD... or UEFI Hard Disk
Save settings and exit (F4 and Yes)


Раскрыть
titleH8m1 H8m2 H8m3 H8m4 H9m1 H9m2 H9m3 H9m4

Advanced \ Boot Feature \ Restore on AC Power Loss = Power ON
Boot \ Boot Mode Select = UEFI
Boot \ Boot Option #1 = INTEL SSD... or UEFI Hard Disk
Advanced\Chipset Configuration\System Agent (SA) Configuration\Graphics Configuration\Primary Dispaly = IGFX
Advanced\Chipset Configuration\System Agent (SA) Configuration\Graphics Configuration\Internal Graphics = Enable
Save settings and exit (F4 and Yes)


Раскрыть
titleNeuroStation Compact


Serial numberSystem DiskSystem imageBIOS Settings

G5m1
G5m2
G5m4
G5m5
G5u1
G20m1
G22m1

USB-flash 16GB/32GB

Trassir-4.3.1.1-1165372-MiniNeuroStation1030-64
Instructions for recording ISO image
The necessary file is in the archive with the extension .rbi


Раскрыть
titleG5m1 G5m2 G5u1 G5m4 G5m5

Switch to Advanced Mode by pressing F6
Advanced \ Chipset Configuration \ Primary Graphics Adapter = Onboard
Advanced \ Chipset Configuration \ Restore on AC Power Loss = Power ON
Boot \ Boot Option #1 = UEFI: JetFlashTranscend
Boot \ Full Screen Logo = Disabled
Save settings and exit (F10 and Yes)


Раскрыть
titleG20m1

Press F2 to enter the BIOS.
Configure the following parameters:
Switch to Advanced Mode by pressing F6
Advanced \ Chipset Configuration \ Primary Graphics Adapter = Onboard
Advanced \ Chipset Configuration \ Restore on AC Power Loss = Power ON
Boot \ Boot Option #1 = UEFI: JetFlashTranscend
Boot \ Full Screen Logo = Disabled

Save settings and exit (F10 and Yes)


Раскрыть
titleG22m1

Save BIOS Settings (F10 and YES)..
Configure the following parameters:
Advanced \ Chipset Configuration \ Primary Graphics Adapter = Onboard
Advanced \ Chipset Configuration \ Restore on AC Power Loss = Power ON
Boot \ Boot Option #1 = UEFI: JetFlashTranscend
Boot \ Full Screen Logo = Disabled

Save settings and exit (F10 and Yes)


Раскрыть
titleNeurostation


Serial numberSystem DiskSystem imageBIOS Settings

G1m1
G1u1
G2m1
G3m1
G3m2
G3u2
G3u3

USB-flash 32GBSwitch to Advanced Mode by pressing F6
Advanced \ Chipset Configuration \ Restore on AC Power Loss = Power ON
Boot \ Boot Option #1 = UEFI: JetFlashTranscend
Boot \ Full Screen Logo = Disabled
Save settings and exit (F10 and Yes)
G7m1
G7m3
SSD UltraM.2


Раскрыть
titleG7m1

Switch to Advanced Mode by pressing F6
Advanced \ Chipset Configuration \ Restore AC Power Loss = Power ON
Boot \ Boot Option #1 = UEFI OS (M2_1:TS32GMTS400)
Boot \ Full Screen Logo = Disable
Save settings and exit (F10 and Yes)


Раскрыть
titleG7m3

Boot \ Security \ Secure Boot = Disable
Secure Boot \ Boot Option #1 = UEFI OS (M2_1: TS32GMTS400)
Boot \ USB Device BBS Priorities\Boot Option #1 = UEFI OS (M2_1: TS32GMTS400)
Advanced \ Chipset Configuration \ Primary Graphics Adapter = Onboard
Advanced \ APM Configuration \ Restore AC Power Loss = Power ON
Save settings and exit (F10 and Yes)


G8m1
G8m2
USB-flash 32GB


Раскрыть
titleG8m1

Switch to Advanced Mode by pressing F6
Advanced \ Chipset Configuration \ Restore on AC Power Loss = Power ON
Boot \ Boot Option #1 = UEFI: JetFlashTranscend
Boot \ Full Screen Logo = Disabled
Save settings and exit (F10 and Yes)


Раскрыть
titleG8m2

Switch to Advanced Mode by pressing F6
Advanced \ Chipset Configuration \ Primary Graphics Adapter = Onboard
Advanced \ Chipset Configuration \ Restore on AC Power Loss = Power ON
Boot \ Boot Option #1 = UEFI: JetFlashTranscend
Boot \ Full Screen Logo = Disabled
Save settings and exit (F10 and Yes)


G10m3
G10m5

SSD M.2 128GB by PCI-adapter
or
USB-flash 32GB
Switch to Advanced Mode by pressing F6
Advanced \ Chipset Configuration \ Primary Graphics Adapter = Onboard
Advanced \ Chipset Configuration \ Restore on AC Power Loss = Power ON
Boot \ Boot Option #1 = UEFI: JetFlashTranscend or PS128GPM280SSDR
Boot \ Full Screen Logo = Disabled
Save settings and exit (F10 and Yes)

G12m1
G12m2
G12m3

SSD M.2 32GBEnter the BIOS and change its parameters:
Switch to Advanced Mode by pressing F6
Advanced \ Chipset Configuration \ Primary Graphics Adapter = Onboard
Advanced \ Chipset Configuration \ Restore AC Power Loss = Power ON
Boot \ Boot Option #1 = UEFI OS (M2_1:TS32GMTS400)
Boot \ Full Screen Logo = Disable

Save BIOS Settings (F10 and YES).

G18m1
G18m2
G18m7
G18m8

SSD M.2 128GB by PCI-adapter
or
USB-flash 32GB
Press DELETE to enter the BIOS.
Configure the following parameters:
BIOS \ Full Screen LOGO Show -> Disabled
BIOS \ Boot Option #1 -> UEFI: JetFlashTranscend 32GB 1100, Partition 1
Peripherals \ Initial Display Output -> IGFX
Chipset \ Internal Graphics -> Enabled
Power \ AC BACK -> Always On

Save settings and exit (F10 and Yes)

G19m1
G19m2
G19m3

SSD M.2 128GB

RBI image for SSD

Trassir-4.3.1.1-1165359-NeuroStation1030-64
Instructions for writing an image to the integrated memory
The necessary file is in the archive with the extension .rbi
Press DELETE to enter the BIOS.
Configure the following parameters:
BIOS \ Full Screen LOGO Show -> Disabled
BIOS \ Boot Option #1 -> UEFI: JetFlashTranscend 32GB 1100, Partition 1
Peripherals \ Initial Display Output -> IGFX
Chipset \ Internal Graphics -> Enabled
Power \ AC BACK -> Always On

Save settings and exit (F10 and Yes)


Раскрыть
titleNeuroStation Base


Serial numberSystem DiskSystem imageBIOS Settings
G3m4SSD M.2 128GB by PCI-adapter
or
USB-flash 32GB
Switch to Advanced Mode by pressing F6
Advanced \ Chipset Configuration \ Primary Graphics Adapter = Onboard
Advanced \ Chipset Configuration \ Restore on AC Power Loss = Power ON
Boot \ Boot Option #1 = UEFI: JetFlashTranscend or PS128GPM280SSDR
Boot \ Full Screen Logo = Disabled
Save settings and exit (F10 and Yes)
G9m1
G9m3
USB-flash 32GBSwitch to Advanced Mode by pressing F6
Advanced \ Chipset Configuration \ Primary Graphics Adapter = Onboard
Advanced \ Chipset Configuration \ Restore on AC Power Loss = Power ON
Boot \ Boot Option #1 = UEFI: JetFlashTranscend
Boot \ Full Screen Logo = Disabled
Save settings and exit (F10 and Yes)
G10m2SSD M.2 128GB by PCI-adapter
or
USB-flash 32GB
Switch to Advanced Mode by pressing F6
Advanced \ Chipset Configuration \ Primary Graphics Adapter = Onboard
Advanced \ Chipset Configuration \ Restore on AC Power Loss = Power ON
Boot \ Boot Option #1 = UEFI: JetFlashTranscend or PS128GPM280SSDR
Boot \ Full Screen Logo = Disabled
Save settings and exit (F10 and Yes)


Раскрыть
titleNeuroStation Pro


Serial numberSystem DiskSystem imageBIOS Settings
G3m3
G3u1
SSD M.2 128GB by PCI-adapter
or
USB-flash 32GB
Switch to Advanced Mode by pressing F6
Advanced \ Chipset Configuration \ Primary Graphics Adapter = Onboard
Advanced \ Chipset Configuration \ Restore on AC Power Loss = Power ON
Boot \ Boot Option #1 = UEFI: JetFlashTranscend or PS128GPM280SSDR
Boot \ Full Screen Logo = Disabled
Save settings and exit (F10 and Yes)
G7m2SSD UltraM.2Switch to Advanced Mode by pressing F6
Boot \ Security \ Secure Boot = Disable
Advanced \ Chipset Configuration \ Primary Graphics Adapter = Onboard
Advanced \ APM Configuration \ Restore AC Power Loss = Power ON
Boot \ Boot Option #1 = UEFI OS (M2_1: TS32GMTS400)
Save settings and exit (F10 and Yes)
G10m4SSD M.2 128GB by PCI-adapter
or
USB-flash 32GB
Switch to Advanced Mode by pressing F6
Advanced \ Chipset Configuration \ Primary Graphics Adapter = Onboard
Advanced \ Chipset Configuration \ Restore on AC Power Loss = Power ON
Boot \ Boot Option #1 = UEFI: JetFlashTranscend or PS128GPM280SSDR
Boot \ Full Screen Logo = Disabled
Save settings and exit (F10 and Yes)
G21m1SSD 128GB

Switch to Advanced Mode by pressing F6
Advanced \ Chipset Configuration \ Primary Graphics Adapter = Onboard
Advanced \ Chipset Configuration \ Restore on AC Power Loss = Power ON
Boot \ Boot Option #1 = UEFI: JetFlashTranscend or PS128GPM280SSDR
Boot \ Full Screen Logo = Disabled
Save settings and exit (F10 and Yes)


Раскрыть
titleTRASSIR NVR-7xxx


Serial numberSystem DiskSystem imageBIOS Settings
M15m1
M15m2
USB-flash 32GBSecurity \ Secure Boot = Disable
Boot \ Boot Options Priorities \ Boot Option #1 = UEFI: JetFlashTranscend
Advanced \ Chipset Configuration \ Restore AC Power Loss = Power ON
Save settings and exit (F10 and Yes)
M16m1SSD 128GBPress DELETE to enter the BIOS.
Configure the following parameters:
BIOS \ Full Screen LOGO Show -> Disabled
BIOS \ Boot Option #1 -> UEFI: SSD ASX6000LNP-128GT-C Partition 1
Peripherals \ Initial Display Output -> PCIE
Chipset \ Internal Graphics -> Enabled
Power \ AC BACK -> Always On

Save settings and exit (F10 and Yes)
M17m1SSD M.2 128GB by PCI-adapter
or
USB-flash 32GB
Press DELETE to enter the BIOS.
Configure the following parameters:
BIOS \ Full Screen LOGO Show -> Disabled
BIOS \ Boot Option #1 -> UEFI: JetFlashTranscend 32GB 1100, Partition 1
Peripherals \ Initial Display Output -> IGFX
Chipset \ Internal Graphics -> Enabled
Power \ AC BACK -> Always On

Save settings and exit (F10 and Yes)
G18m3
G18m5
G18m9

SSD M.2 128GB

RBI image for SSD

Trassir-4.3.1.1-1165359-NeuroStation1030-64
Instructions for writing an image to the integrated memory
The necessary file is in the archive with the extension .rbi
Press DELETE to enter the BIOS.
Configure the following parameters:
BIOS \ Full Screen LOGO Show -> Disabled
BIOS \ Boot Option #1 -> UEFI Hard Disk: UEFI OS
Peripherals \ Initial Display Output -> IGFX
Chipset \ Internal Graphics -> Enabled
Power \ AC BACK -> Always On

Save settings and exit (F10 and Yes)


Раскрыть
titleTRASSIR NVR-8xxx


Serial numberSystem DiskSystem imageBIOS Settings

G3m5
G3m6

SSD M.2 128GB by PCI-adapter
or
USB-flash 32GB
Switch to Advanced Mode by pressing F6
Advanced \ Chipset Configuration \ Primary Graphics Adapter = Onboard
Advanced \ Chipset Configuration \ Restore on AC Power Loss = Power ON
Boot \ Boot Option #1 = UEFI: JetFlashTranscend or PS128GPM280SSDR
Boot \ Full Screen Logo = Disabled
Save settings and exit (F10 and Yes)
G5m3
G5m4
USB-flash 16GB

Trassir-4.3.1.1-1165372-MiniNeuroStation1030-64
Instructions for recording ISO image
The necessary file is in the archive with the extension .rbi

Switch to Advanced Mode by pressing F6
Advanced \ Chipset Configuration \ Primary Graphics Adapter = Onboard
Advanced \ Chipset Configuration \ Restore on AC Power Loss = Power ON
Boot \ Boot Option #1 = UEFI: JetFlashTranscend
Boot \ Full Screen Logo = Disabled
Save settings and exit (F10 and Yes)
G10m6SSD M.2 128GB by PCI-adapter
or
USB-flash 32GB
Switch to Advanced Mode by pressing F6
Advanced \ Chipset Configuration \ Primary Graphics Adapter = Onboard
Advanced \ Chipset Configuration \ Restore on AC Power Loss = Power ON
Boot \ Boot Option #1 = UEFI: JetFlashTranscend or PS128GPM280SSDR
Boot \ Full Screen Logo = Disabled
Save settings and exit (F10 and Yes)
G12m1
G12m2
SSD UltraM.2Switch to Advanced Mode by pressing F6
Boot \ Security \ Secure Boot = Disable
Advanced \ Chipset Configuration \ Primary Graphics Adapter = Onboard
Advanced \ APM Configuration \ Restore AC Power Loss = Power ON
Boot \ Boot Option #1 = UEFI OS (M2_1: TS32GMTS400)
Save settings and exit (F10 and Yes)
G12m3SSD M.2 32GB
Switch to Advanced Mode by pressing F6
Boot \ Security \ Secure Boot = Disable
Advanced \ Chipset Configuration \ Primary Graphics Adapter = Onboard
Advanced \ APM Configuration \ Restore AC Power Loss = Power ON
Boot \ Boot Option #1 = UEFI OS (M2_1: TS32GMTS400)
Save settings and exit (F10 and Yes)
G13m1
G13m2
USB-flash 16GBSwitch to Advanced Mode by pressing F6
Advanced \ Chipset Configuration \ Primary Graphics Adapter = Onboard
Advanced \ Chipset Configuration \ Restore on AC Power Loss = Power ON
Boot \ Boot Option #1 = UEFI: JetFlashTranscend
Boot \ Full Screen Logo = Disabled
Save settings and exit (F10 and Yes)
G15m1
G15m2
G15m4
G15m5
G15m7
SSD UltraM.2Peripherals\Initial Display Output = IGFX
Chipset\Internal Graphics = Enabled
Power\AC BACK = Always On
BIOS\Boot option #1 = UEFI OS (M2_1:TS32GMTS400)
BIOS\ Full Screen LOGO Show = Disable
Save settings and exit (F10 and Yes)
G15m3
G15m6
SSD UltraM.2Peripherals\Initial Display Output = IGFX
Chipset\Internal Graphics = Enabled
Power\AC BACK = Always On
BIOS\Boot option #1 = UEFI OS (M2_1:TS32GMTS400)
BIOS\ Full Screen LOGO Show = Disable
Save settings and exit (F10 and Yes)

G17m1
G17m2
G17m3
G17m4
G17m5
G17m6
G17m7
G17m8
G17m9

SSD M.2 128GB by PCI-adapter
or
USB-flash 32GB
Press DELETE to enter the BIOS.
Switch to Advanced Mode by pressing F7
Configure the following parameters:
SETTINGS\Advanced\Integrated Graphics Configuration\Initiate Graphic Adapter = IGD
SETTINGS\Advanced\Power Management Setup\Restore after AC Power Lose = Power On
SETTINGS\Boot\Boot Option #1 = UEFI: JetFlashTranscend
SETTINGS\Boot\Full Screen Logo Display = Disabled

Save settings and exit (F10 and Yes)
G18m4
G18m6
SSD M.2 128GB

RBI image for SSD

Trassir-4.3.1.1-1165359-NeuroStation1030-64
Instructions for writing an image to the integrated memory
The necessary file is in the archive with the extension .rbi
Press DELETE to enter the BIOS.
Configure the following parameters:
BIOS \ Full Screen LOGO Show -> Disabled
BIOS \ Boot Option #1 -> UEFI Hard Disk: UEFI OS
Peripherals \ Initial Display Output -> IGFX
Chipset \ Internal Graphics -> Enabled
Power \ AC BACK -> Always On

Save settings and exit (F10 and Yes)
G20m1USB-flash 16GB or 32GBSwitch to Advanced Mode by pressing F6
Advanced \ Chipset Configuration \ Primary Graphics Adapter = Onboard
Advanced \ Chipset Configuration \ Restore on AC Power Loss = Power ON
Boot \ Boot Option #1 = UEFI: JetFlashTranscend
Boot \ Full Screen Logo = Disabled
Save settings and exit (F10 and Yes)
G20m2USB-flash 16GBSwitch to Advanced Mode by pressing F6
Advanced \ Chipset Configuration \ Primary Graphics Adapter = Onboard
Advanced \ Chipset Configuration \ Restore on AC Power Loss = Power ON
Boot \ Boot Option #1 = UEFI: JetFlashTranscend
Boot \ Full Screen Logo = Disabled
Save settings and exit (F10 and Yes)
G23m1SSD M.2 128GB

RBI image for SSD

Trassir-4.3.1.1-1165364-NeuroStation3070-64
Instructions for writing an image to the integrated memory
The necessary file is in the archive with the extension .rbi
Press DELETE to enter the BIOS.
Configure the following parameters:
BIOS \ Full Screen LOGO Show -> Disabled
BIOS \ Boot Option #1 -> UEFI Hard Disk: UEFI OS
Peripherals \ Initial Display Output -> IGFX
Chipset \ Internal Graphics -> Enabled
Power \ AC BACK -> Always On

Save settings and exit (F10 and Yes)

G24m1
G25m1
G25m2
G25m3
G25m6

SSD M.2 128GB

RBI image for SSD

Trassir-4.4.1.0-1181060-NeuroStation1030G10-64


Switch to Advanced Mode by pressing F6
Advanced \ Chipset Configuration \ Primary Graphics Adapter = Onboard
Advanced \ Chipset Configuration \ Restore on AC Power Loss = Power ON
Boot \ Boot Option #1 = UEFI: ASX6000LNP-128GT-C
Boot \ Full Screen Logo = Disabled
Save settings and exit (F10 and Yes)