Preparing a USB drive for image recording
- Download and unzip the system image with TRASSIR OS suitable for your registrar in the article Choosing an image to create a system disk with TRASSIR OS.
- Download and unzip the image of the image recording utility:
- image_writer_16 — for USB drives with a size of 16 GB. The space for recording the system image with TRASSIR OS is 7.5 GB.
- image_writer_32 — for USB drives with a size of 32 GB or more. The space for recording the system image with TRASSIR OS is 21 GB.
Download and unzip the utility USB Image Tool.
You can use other programs to write the image to USB media, for example, balenaEtcher.
- Launch the USB Image Tool.exe on behalf of the administrator. To do this, right-click on the file and select Run as Administrator in the menu that appears.
If Windows requests permission to make changes, click Yes. - Go to the Favorites tab. Click the Add button and specify the path to the image_writer_xx.img image.
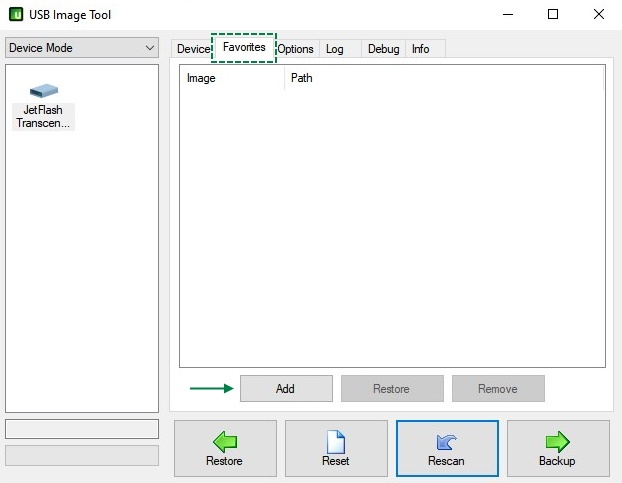
Make sure that the appropriate USB drive is selected on the left side of the window, and the image_writer_xx.img image is in the Favorites tab. Click Restore to start recording the image.
Wait for the image recording to finish.
After recording the image, a disk with the name Images will appear in the system. Copy the system image from TRASSIR OS and the license file to it.

If there is no license file
- Contact DSSL to get the license file as described в статье о восстановлении лицензии.
- you can also not write the license file to a USB drive, the utility will allow you to write only the system image. When you first start the registrar, you will need to download the license file manually or автоматически через интернет.
+If the disk does not appear


Writing an image to the built-in memory
Writing an image to the built-in Before recording an image, it is recommended to disconnect any drives from the recorder — other USB media or archival HDD.my memory
- Connect the prepared USB drive to one of the USB ports of the recorder.
- Turn on the recorder. Press the F12 key to enter the media selection menu for downloading.
To securely enter the menu, keep pressing and releasing the F12 key until the menu loads. If the registrar has started running TRASSIR software, restart the registrar and try again. In the Boot media selection menu, use the up and down arrow keys to select the prepared USB drive (EFI USB Device) and press Enter.

If the prepared USB drive does not appear in the boot media selection menu, try turning off the recorder, installing the drive in another USB port and entering the menu again.
- If everything is done correctly, instead of downloading the TRASSIR software, tech1production will start downloading.

The image recording will start automatically after about 30 seconds.
If instead of recording the image, a black screen with a toolbar is displayed, which means that for some reason the script autorun did not work.
In this case, the launch can be performed manually
- Image recording will begin

- If several images are recorded on the media, the recording script displays a list of them and prompts you to select the one you need. Enter the number of the desired image and press Enter.

- If several license files for the security key installed in the registrar are recorded on the media, the recording script will display a list of them and prompt you to select the one you need. Enter the license file number and press Enter.

- If several images are recorded on the media, the recording script displays a list of them and prompts you to select the one you need. Enter the number of the desired image and press Enter.
- When the image is written to the built-in memory, the recording script turns off the NVR.

- Disconnect the USB drive from the recorder.
It is recommended to check that the BIOS settings on the recorder are set in the same way as indicated in the article Choosing an iso to create a system disk with TRASSIR OS
To enter the BIOS, turn on the recorder and press F2.
To securely enter the BIOS, keep pressing and releasing the F2 key until the BIOS start menu loads.
If the script is interrupted

Most likely, the script did not detect the image file or license file on the USB drive. You can still write an image or a license file to the registrar. Enter the number of the desired option and press Enter.
After recording the image, the menu will appear again. To turn off the recorder, enter the number 3 and press Enter.